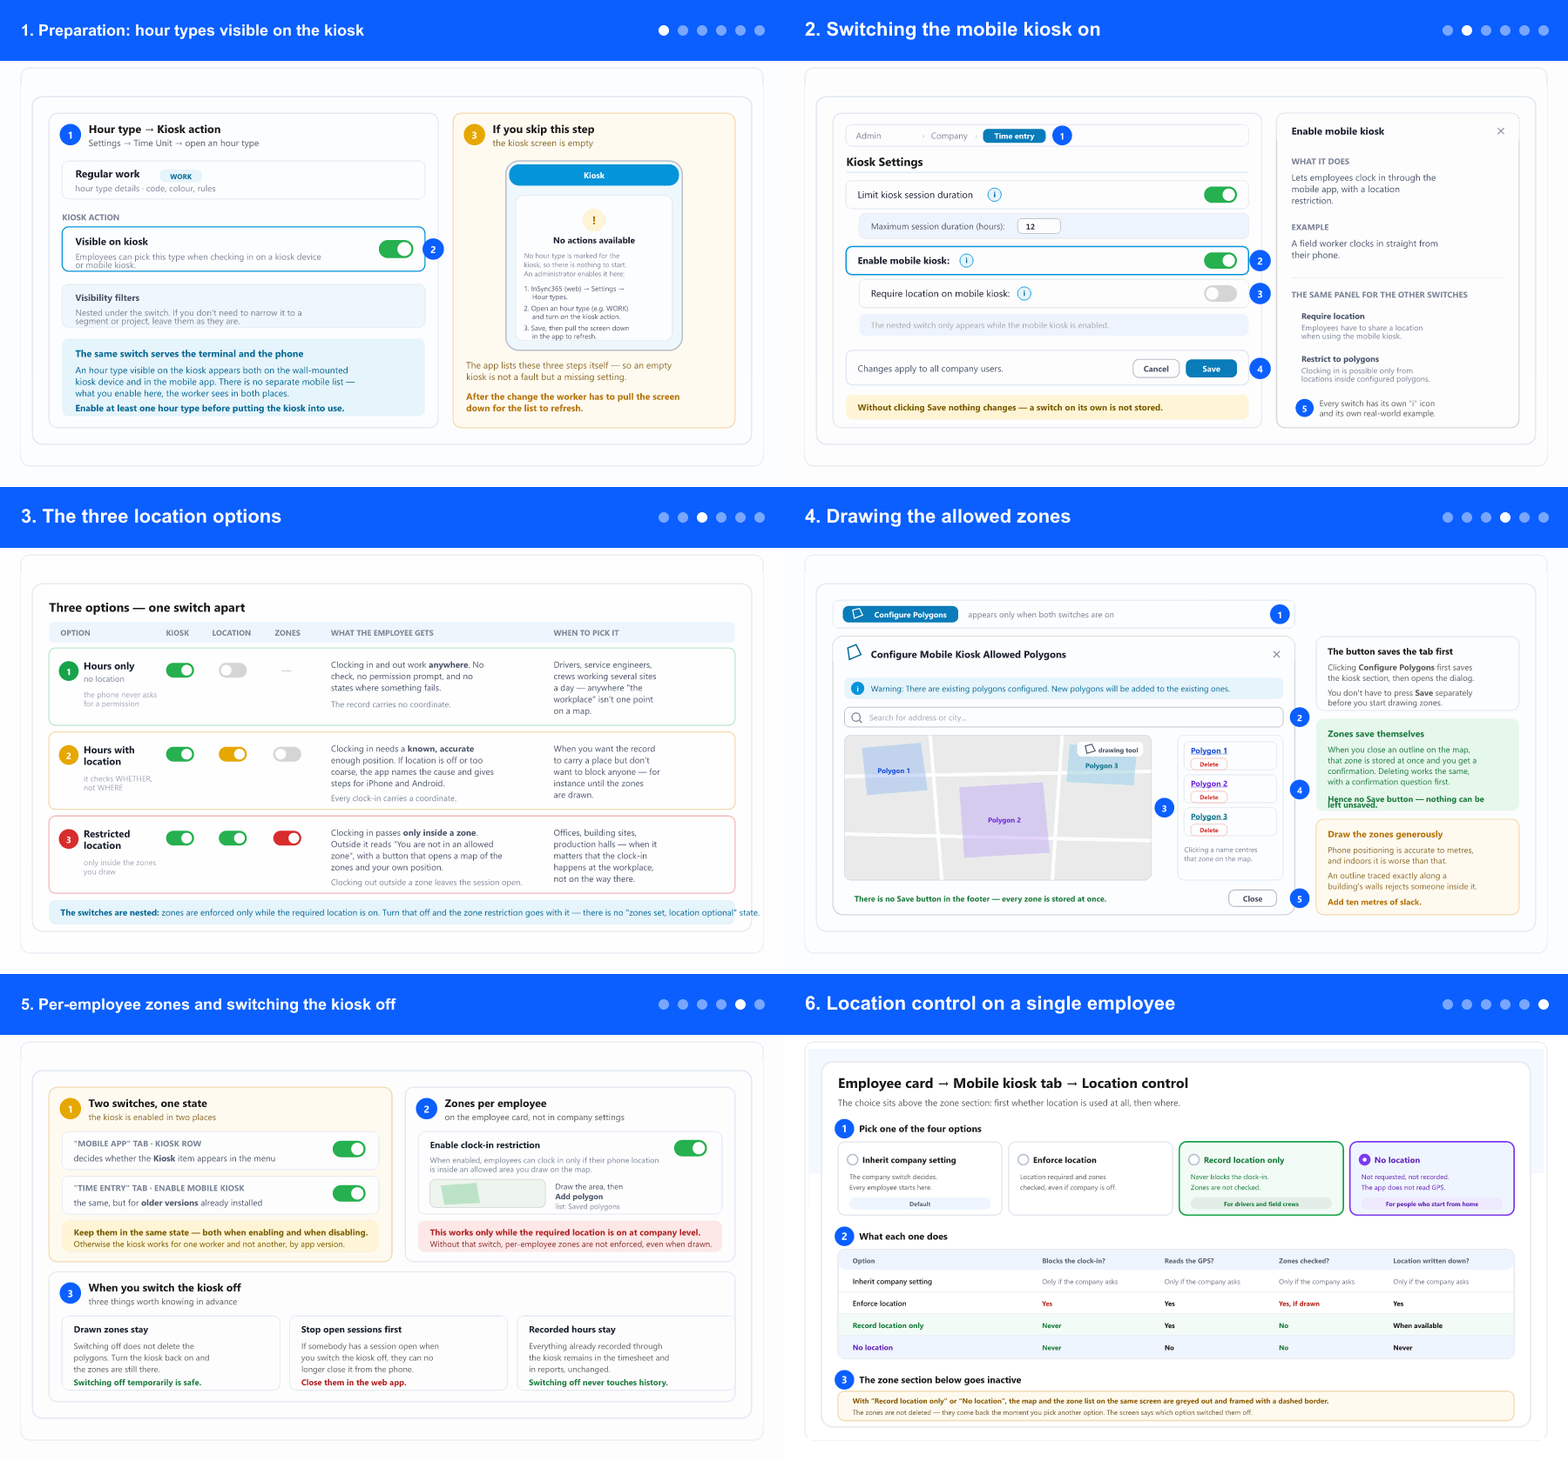
1. Preparation: hour types visible on the kiosk
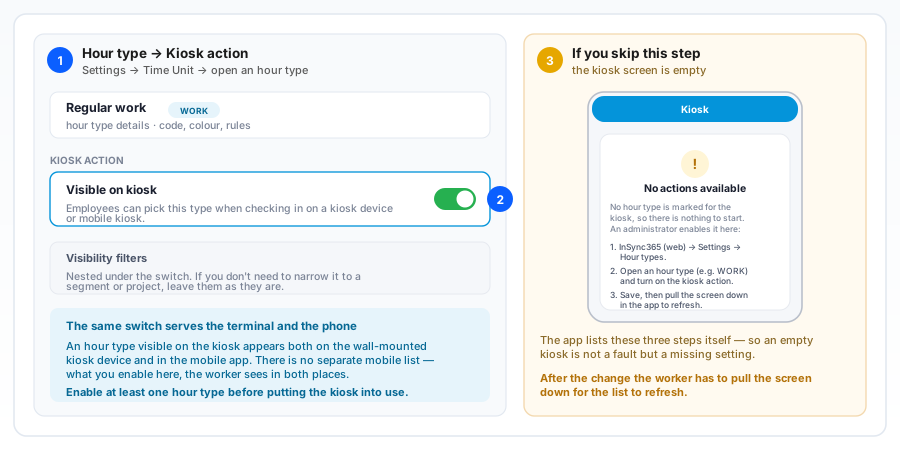
Open the “Time Unit” screenopens in a new window · you need to be signed in
- This is the only step that is not done in company settings, and without it the kiosk has nothing to offer. Do it first.
- Open Settings → Time Unit and go into the hour type workers need to be able to start on the kiosk — typically regular work, break, field work.
- Under the Kiosk action section turn on Visible on kiosk. The text under the switch says exactly what it does: employees can pick this type when checking in on a kiosk device or mobile kiosk.
- The same switch serves both the terminal and the phone — there is no separate list for the mobile kiosk. What you enable here, the worker sees in both places.
- Repeat for every hour type you want on the kiosk, then save. The visibility filters under the switch are optional — leave them as they are unless you need to narrow to a segment or project.
- If you skip this step, the kiosk screen in the app reads No actions available and lists these same three steps itself. That is not a fault but a missing setting.
- After the change the worker needs to pull the screen down in the app for the list to refresh.
2. Switching the mobile kiosk on
Open the “Time entry” tabopens in a new window · you need to be signed in
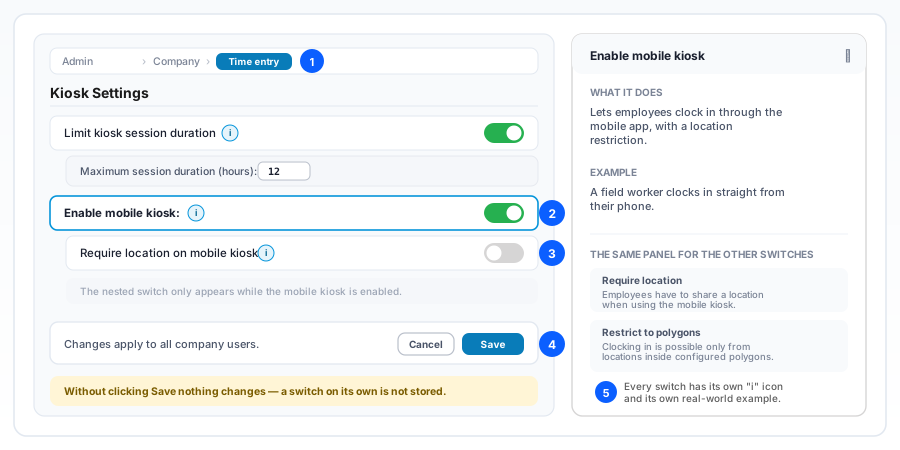
- In the left menu open Admin → Company, then the Time entry tab. Scroll to the Kiosk Settings section.
- Turn on Enable mobile kiosk. Only then does the nested location switch appear below it — while the kiosk is off, the location option is not shown at all.
- Above it sits Limit kiosk session duration with the Maximum session duration (hours) field. That setting covers both the terminal and the mobile kiosk and automatically closes sessions that exceed the limit — a useful guard against a record left open overnight.
- Click Save. The bar at the bottom reminds you that changes apply to all company users. Without clicking Save, the switch is not stored.
- Every switch has a small "i" icon. Clicking it opens a panel with What it does and an Example — handy when two people disagree about what a setting actually does.
3. The three location options
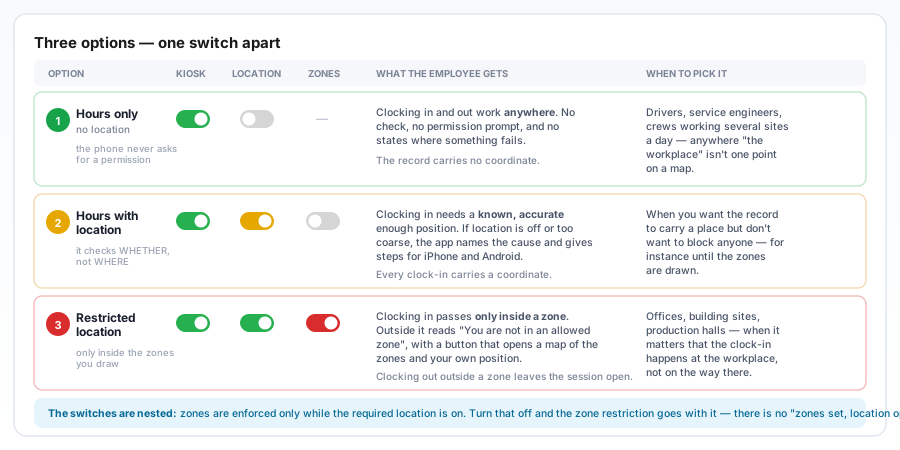
- Option 1 — hours only. Leave Require location on mobile kiosk off. Clocking in and out work anywhere, the phone never asks for a location permission, and there are no states where something fails. Pick it for drivers, service engineers and crews changing sites daily.
- Option 2 — hours with location. Turn on Require location on mobile kiosk. Clocking in needs a known and accurate enough position, but it is not checked where the person is. Every clock-in then carries a coordinate. Pick it when you want a place on the record without blocking anyone — for instance until the zones are drawn.
- Option 3 — restricted location. On top of the required location, also turn on Restrict location to polygons on mobile kiosk. Clocking in passes only inside a zone; outside it the worker gets You are not in an allowed zone and a button that opens a map. Pick it for offices, building sites and production halls.
- The switches are nested: zones are enforced only while the required location is on. Turn the required location off and the zone restriction goes with it — there is no "zones set, location optional" state.
- In every option the location is used only at the moment of clocking in and out. The app does not track the position in between, and that is what to tell workers when they ask.
- With option 3, count on the reverse case too: clocking out from outside a zone does not pass, and the session stays open. The app walks the worker through the steps, but ultimately an administrator closes the record in the web app.
4. Drawing the allowed zones
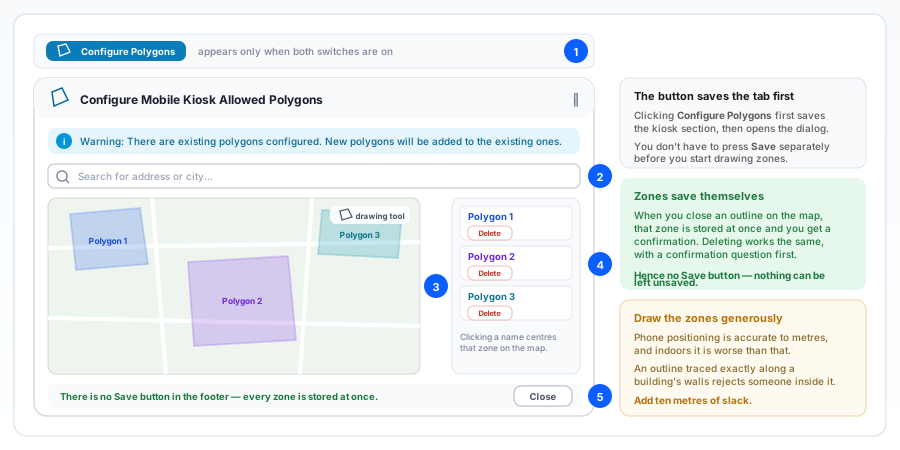
- The Configure Polygons button appears only when both switches are on — the required location and the polygon restriction.
- Clicking that button first saves the kiosk section, then opens the dialog. You don't have to press Save separately before you start drawing.
- At the top of the dialog is Search for address or city — the fastest way to bring the map to the location instead of panning by hand.
- Use the drawing tool to outline an area. When you close the outline, the zone is stored at once and you get a confirmation. That is why the footer only has Close — there is no Save button, because nothing can be left unsaved.
- Drawn zones sit in the list to the side, each in its own colour. Clicking a name centres that zone on the map — useful once you have several.
- Delete removes a zone, with a confirmation question. Deletion is stored at once too.
- If zones already exist, the dialog says so at the top: New polygons will be added to the existing ones. Drawing a new zone does not replace the old ones — it is added.
- Draw the zones wider than seems necessary. Phone positioning is accurate to metres, and indoors it is worse. An outline traced exactly along a building's walls rejects someone standing inside it; add ten metres of slack.
5. Per-employee zones and switching the kiosk off
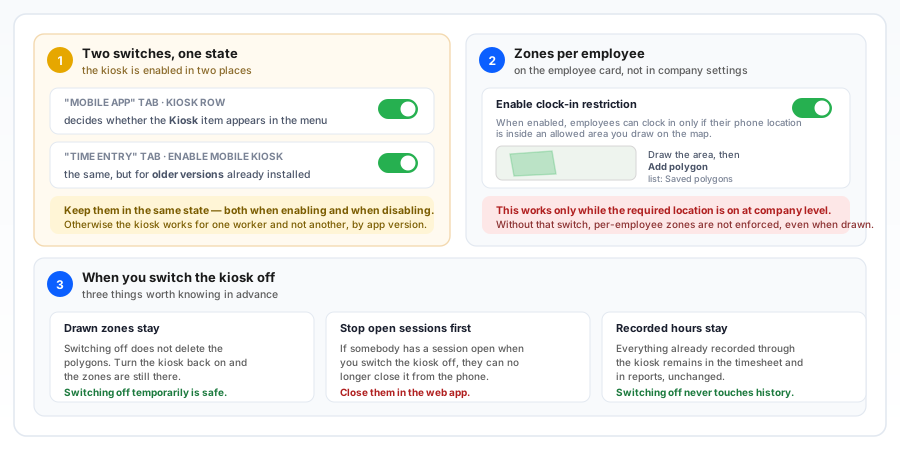
- Besides company-wide zones there are also per-employee zones. You don't set those in company settings but on the employee's own card — see The mobile kiosk: clocking in from a phone, step 3.
- There you turn on Enable clock-in restriction, draw an area and click Add polygon; the drawn zones sit in the Saved polygons list.
- Use them when different people work at different locations — one crew on one site, another on a different one — where a company-wide zone would make no sense.
- Per-employee zones follow whether location is enforced for that person. By default that is decided by the company switch — without it they are not checked, even when drawn. That is the most common cause of "I set his zone and he still clocks in from anywhere". Since the location control described in step 6 you can also settle it on the employee themselves: Enforce location makes their zones apply even when the company switch is off, and Record location only or No location stops them being checked even when it is on.
- When you switch the kiosk off, drawn zones stay stored. Switching off does not delete polygons, so a temporary switch-off is safe — turn it back on and the zones are still there.
- Before switching off, check for open sessions. If somebody has a session open when you switch the kiosk off, they can no longer close it from the phone — close it in the web app, at the correct time.
- Hours already recorded stay unchanged in the timesheet and in reports. Switching the kiosk off never touches history.
6. Location control on a single employee
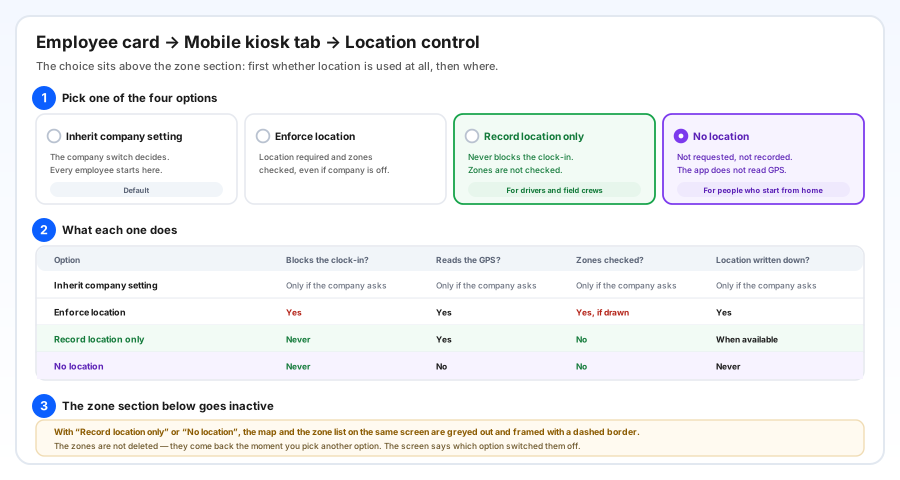
Everything above is decided for the whole company. On the employee's own card you can override it for that one person — useful when most of the crew works at fixed places but some do not.
- Open the employee, go to the Mobile kiosk tab. Location control sits at the top, above the zone section.
- Inherit company setting — the company switch decides, exactly as described in step 3. Every employee starts here, so nothing changes anywhere until you deliberately change it for someone.
- Enforce location — location is required for this person and their zones are checked, even if the company switch is off. Use it for one person you want tied to a fixed place in a company that is otherwise relaxed.
- Record location only — the clock-in always goes through. A refused location permission, a timeout or a weak signal do not stop it; the entry is saved without a location. The position is written down whenever the phone manages to read it. Use it for drivers, service engineers and field crews.
- No location — the clock-in always goes through and no location is recorded, anywhere. The app does not ask for the location permission and does not read the GPS; a location that arrives anyway is not saved, so the timesheet entry has hours and no location. Use it for people whose starting point should not be kept — typically managers who set off on their rounds from home.
- The difference between the last two: Record location only keeps where the day started whenever it can; No location never does. Pick the second when the starting point is private, not just unreliable.
- In Record location only the app still asks for the location permission. If the worker declines, the clock-in goes through regardless — there is no warning banner and no greyed-out buttons, so tell them the refusal costs them nothing.
- Zones are not checked in Record location only or No location — not the company ones, not that employee's own, not project ones. That follows from both options: if nothing may stop the person, a zone cannot either.
- Because of that, choosing it makes the zone section on the same screen inactive — the map and the list are greyed out inside a dashed frame with an explanation that names the option. The zones are not deleted: pick another option and they apply again.
- The info button next to the choice opens all four side by side, with what each one does to blocking, zones and recording.
- The setting is saved the moment you pick an option — there is no separate Save on this control.
- A change applies from that moment on. Entries made earlier keep the location they already had — switching someone to No location does not remove it from past records.
7. Project zones — the third kind, and the only one that names a project
Company zones and per-employee zones are not the only ones read at clock-in. A project can have its own zone, drawn on the project's Location restriction tab, and it behaves differently from the other two in one important way: it also decides which project the hours are booked to.
- The three kinds are read in order: the project zone first, then the employee's own zone, then the company zone. The first one containing the reported position wins and the rest are not read.
- Only the project zone writes a project on the hours. A clock-in from the company or employee zone is allowed, but the project is left empty — neither zone belongs to a project.
- This is why the order matters: if your company zone covers the whole town with every site inside it, a worker standing on a site still gets that project, because the project zone is read first.
- Project zones follow the same master rule as the others: they are only enforced while required location is on at company level.
- Drawing project zones is described in Set up projects and hour types, step 4b.
Related: The mobile kiosk: clocking in from a phone · Mobile app pages · Clocking in at a kiosk and the kiosk dashboard · Setting up a kiosk device · Set up projects and hour types