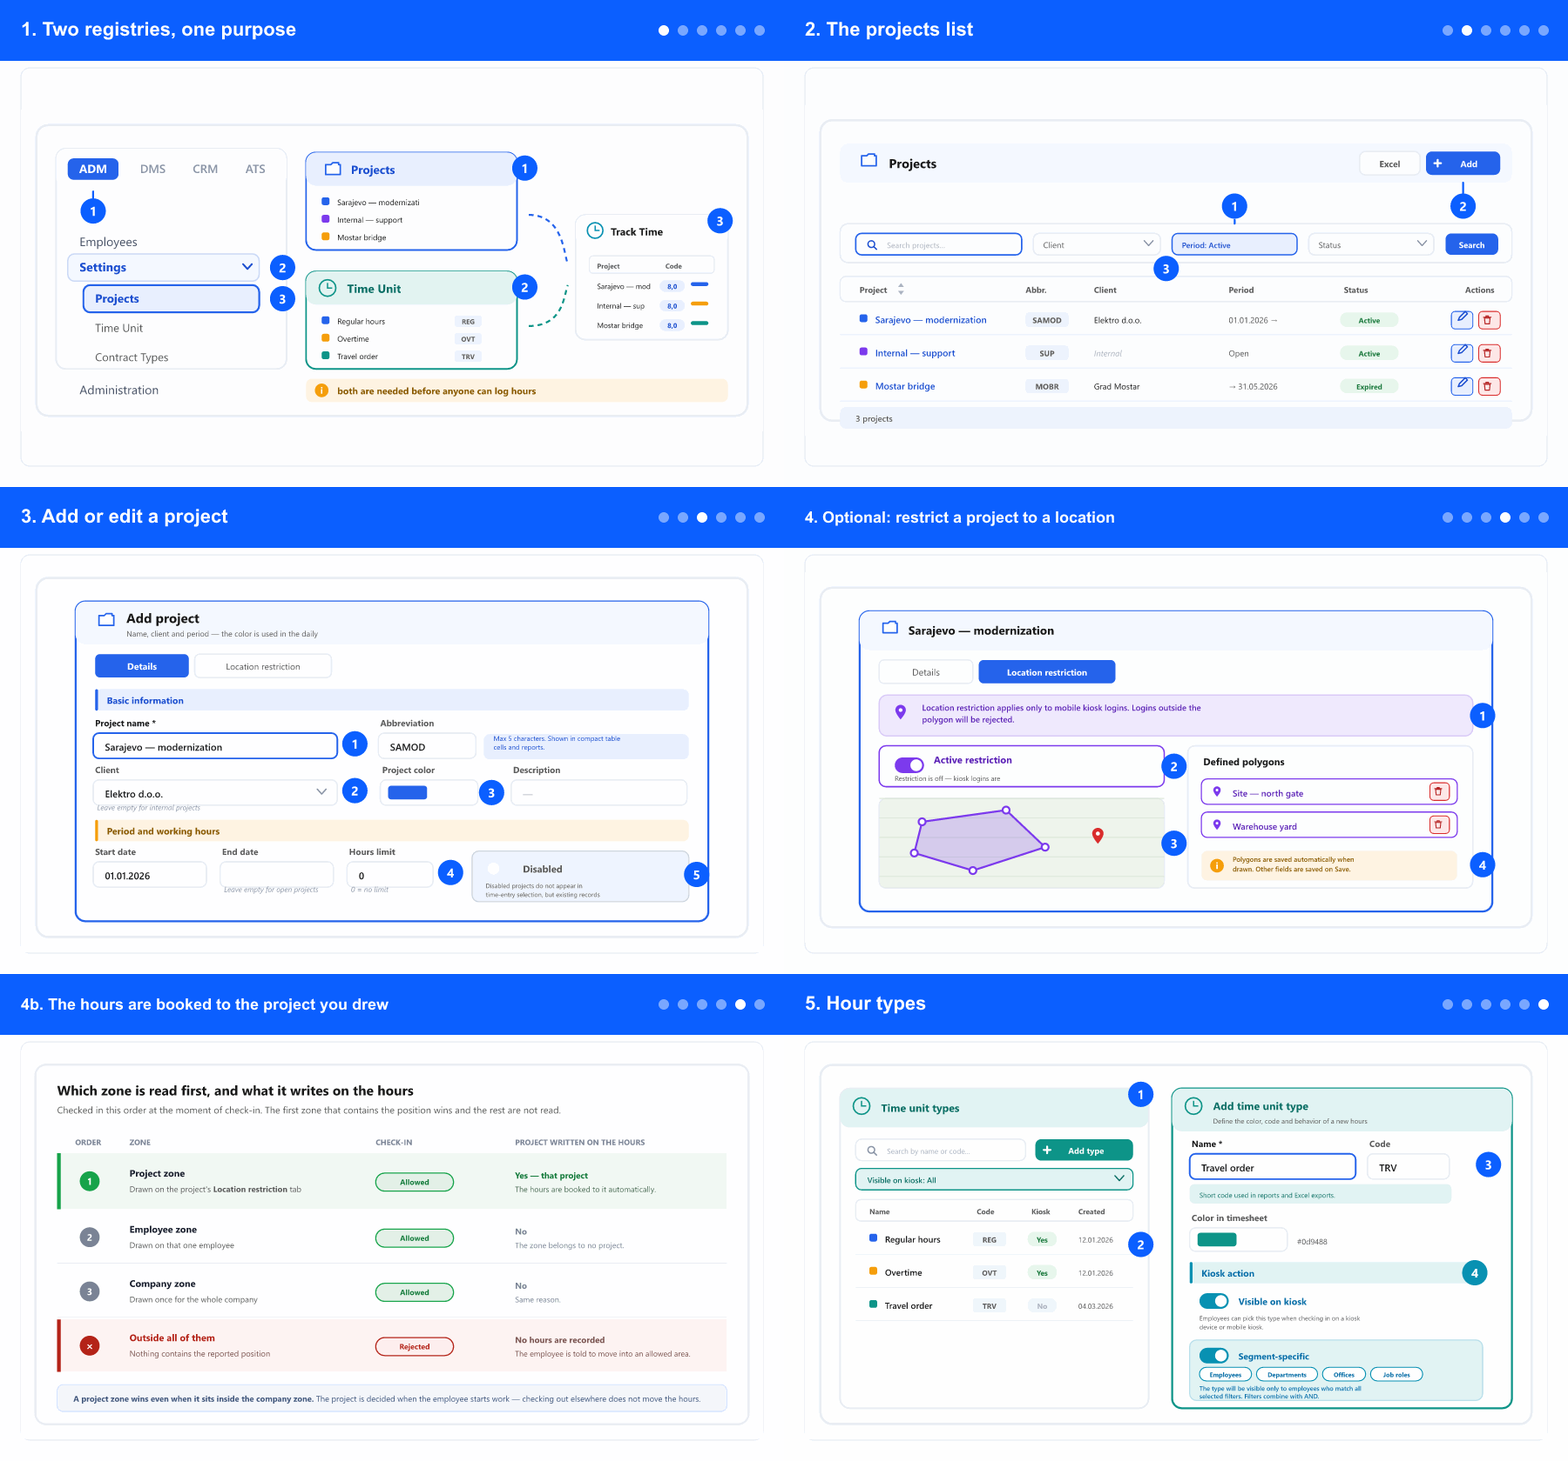
1. Two registries, one purpose
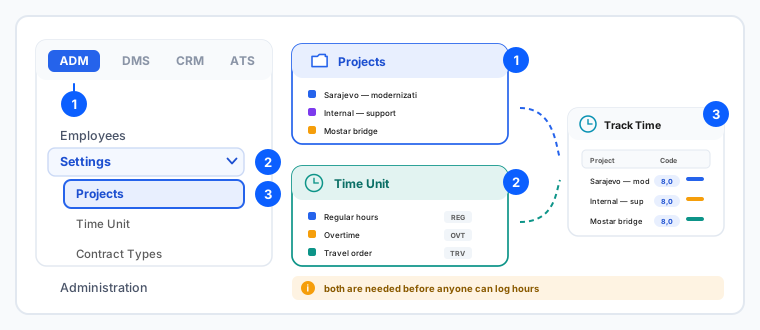
- In the left menu, open the ADM tab and expand Settings. The tabs (ADM / DMS / CRM / ATS) appear only when your company uses more than one module.
- Projects is what a person picks as the row in their timesheet — the work the hours belong to.
- Time Unit (the screen is titled Time unit types) is what a person picks as the kind of hours — regular, overtime, travel and so on.
- Set both up first. An employee with no assigned project sees an empty timesheet and cannot log anything, no matter what else is configured.
2. The projects list
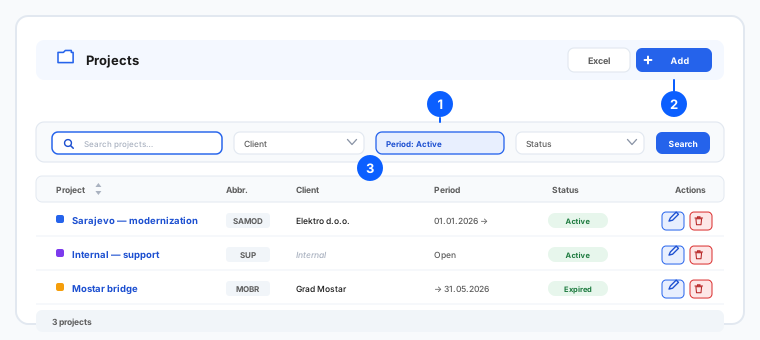
- Each row shows the project's colour, its abbreviation, the Client, the Period and its Status.
- Projects with no client are marked Internal — that is how you separate customer work from your own.
- Filter by Client, by Period (Open, Active, Expired) or by Status (Active, Restricted, Disabled).
- The Expired period filter is the useful one for housekeeping: it lists projects whose end date has passed but which are still offered for time entry.
- Press Search to apply, Clear to reset, and Excel to export the list you see.
3. Add or edit a project
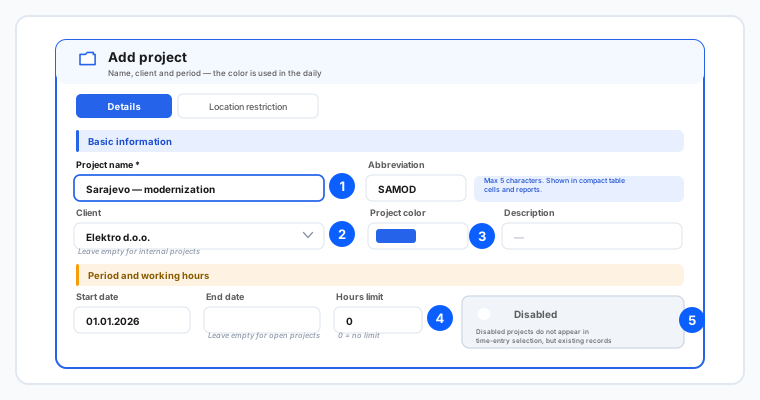
- Click Add project. The window has two tabs — Details and Location restriction. Start with Details.
- Enter the Project name (required) and an Abbreviation of up to 5 characters. The abbreviation is what fits in narrow table cells and reports, so choose something recognisable — not just the first five letters.
- Pick the Client, or leave it empty for internal projects.
- Choose a Project color. It is used in the daily timesheet, so give projects people work on in the same week clearly different colours.
- Set the Start date. Leave the End date empty for an open-ended project; fill it in and the project shows as Expired once that date passes.
- Hours limit caps the hours that may be logged against the project. 0 means no limit — that is the default, so leave it alone unless the project really is capped.
- The Disabled toggle is how you retire a project: disabled projects disappear from the time-entry selection while existing records remain. Prefer this over deleting — history stays intact and reports still add up.
- Click Save.
4. Optional: restrict a project to a location
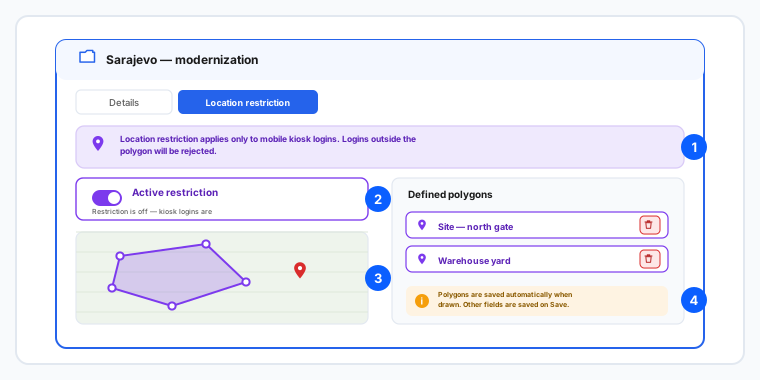
- Open the Location restriction tab. Read the banner first: this applies only to mobile kiosk logins. It does not restrict hours typed in on the web timesheet.
- Turn on Active restriction. While it is off, kiosk check-ins are allowed from anywhere.
- Search for an address or city to move the map, then draw a polygon around the area where check-in should be allowed — a site, a yard, a building.
- Every area you draw is listed under Defined polygons, where you can remove one you no longer need. You can define more than one area for the same project.
- A check-in from outside the polygons is rejected, so draw generously enough to cover the whole working area including its entrances.
- Mind the two different saving rules on this tab: polygons save automatically as you draw them, while the other fields wait for Save.
The restriction is only read for companies where location is required for mobile kiosk check-in. If that company setting is off, the polygons you draw here sit unused — see The mobile kiosk: switching it on and the three location options.
4b. The hours are booked to the project you drew
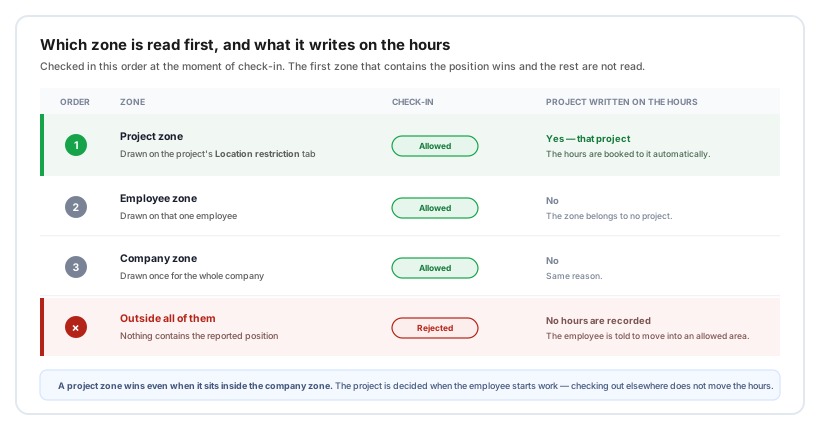
A polygon here does more than open the door. When someone checks in on the mobile kiosk from inside it, this project is written on their hours automatically — nobody picks it, and there is nothing to select on the kiosk screen.
- The zones are read in a fixed order: the project zone first, then the employee's own zone, then the company zone. The first zone containing the position wins and the rest are not read.
- Only a project zone writes a project. The employee and company zones allow the check-in but leave the project empty — they do not belong to any project.
- The order matters when a wide company zone covers your sites: standing on a site still books the hours to that project, because the project zone is read first.
- The project is decided when work starts. Checking out somewhere else at the end of the day does not move the hours. If the employee switches to a different hour type mid-day, that starts a new stretch, which takes the project of wherever they are standing at that moment.
- If two project polygons overlap, the same position always resolves to the same project, so the result does not change between check-ins.
- Hours recorded before you drew the polygon are not touched — nothing is reassigned backwards.
Projects without a polygon behave exactly as before, so you can switch this on one project at a time. The map in the mobile app that shows employees where they may check in draws these project zones too, so what they see matches what happens.
5. Hour types
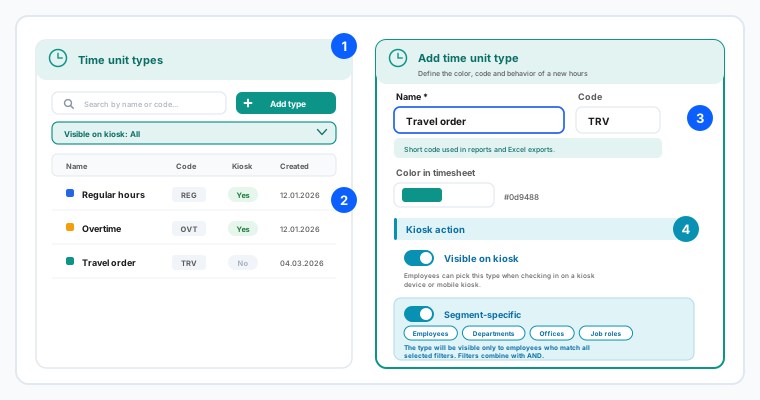
- Open Time Unit. The list shows each type with its Code, whether it is available on the Kiosk, and when it was created. Search by name or code, or filter by Visible on kiosk.
- Click Add type and enter the Name and a short Code. The code is what appears in reports and Excel exports, so keep it short and stable — changing it later makes old exports harder to read.
- Pick the Color in timesheet. It is the colour bar under a cell in the timesheet, which is how people tell at a glance that a day was overtime rather than regular hours.
- Under Kiosk action, turn on Visible on kiosk if employees should be able to pick this type when checking in on a kiosk device or the mobile kiosk. Types used only by administrators stay off.
- Turn on Segment-specific to limit who sees the type, then choose any of Employees, Departments, Offices and Job roles. Leave it off and everyone sees the type.
- The filters combine with AND — someone must match all of them. Picking a department and a job role shows the type only to people who are in that department and hold that role, which is narrower than most people expect.
- When editing an existing type, the window header tells you in how many timesheet entries it is already used — worth reading before you rename or delete it.
Some companies see extra sections in the hour-type window that belong to their own setup. Deleting a type that is already used cannot be undone — disable or rename instead where possible. Projects can also be assigned to employees; a person only sees the projects they are assigned to.
Related: Enter your work hours (timesheet) · View, approve and lock another employee's hours · Set up departments and offices.